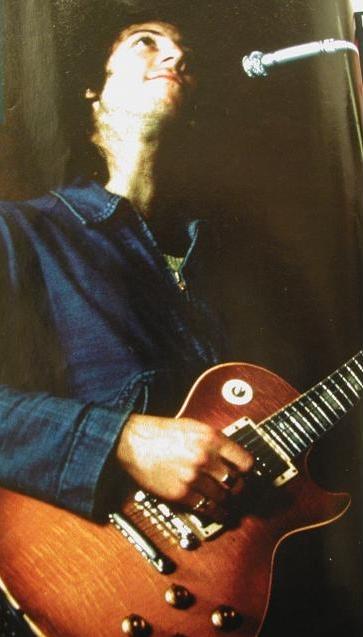
The Peter Green / Gary Moore Gibson Les Paul "Mod"
He has the sweetest tone I ever heard. Hes the only one who gave me the cold sweats.
- B.B. King
Widely hailed as one of the finest British blues guitarists of his generation, Peter Green changed the sonic landscape with his trusty 1959 Les Paul guitar.
Over the years a real legend has built up around not only the man but his instrument, which Green sold to Irish blues/rocker Gary Moore who put it to good use in the studio and live
for decades more. Now in the hands of a private collector, the unique tone of this modified instrument has fueled countless discussions among fans and players.
Upon inspection of the guitar, it is immediately obvious that the neck pickup of the guitar has been rotated 180 degrees so that the exposed pole pieces of the original Gibson PAF
"humbucking" pickup are opposite those found on production examples. Many incorrectly attribute this instrument's unique tone to this change, which in fact results in only a subtle
difference from that found on a stock configuration.
The real cause of the unique tone of this guitar lies deeper, under the deep-drawn German Silver cover. It has to do with a
magical cross between what may have been an accidental re-assembly of a troublesome pickup, and a wiring harness only found on those treasured 1950s Les Paul guitars.
We will now lead you deeper into the mystique of the Les Paul, and provide detailed steps to help approach tonal nirvana ...
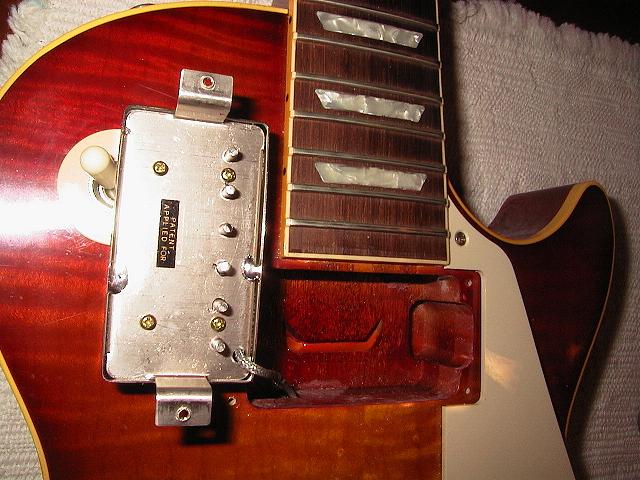 First, carefully remove the pickup rings and pull the pickup out of the body, taking care not to tax the leads which are often cut exactly to length. Our example guitar is a
1999 Gibson Historic 40th Anniversary '59 Reissue, equipped with factory PAF Reissue pickups (complete with a cute "Patent Applied For" sticker for tonal authenticity! The first
step here is to break the solder connections holding the cover to the pickup. You can see the solder in this example as two "blobs" (that's a technical term, folks!) on the left
and right of the pickup. This is best accomplished with a Dremel or similar cutting tool. Take extreme care not to damage the pickup or wiring! Once these connections are cut
the pickup assembly should slide out easily.
First, carefully remove the pickup rings and pull the pickup out of the body, taking care not to tax the leads which are often cut exactly to length. Our example guitar is a
1999 Gibson Historic 40th Anniversary '59 Reissue, equipped with factory PAF Reissue pickups (complete with a cute "Patent Applied For" sticker for tonal authenticity! The first
step here is to break the solder connections holding the cover to the pickup. You can see the solder in this example as two "blobs" (that's a technical term, folks!) on the left
and right of the pickup. This is best accomplished with a Dremel or similar cutting tool. Take extreme care not to damage the pickup or wiring! Once these connections are cut
the pickup assembly should slide out easily.
 With the cover off you can clearly see the geometry of the bare pickup. Whereas most Fender type pickups feature six individual magnets with the coil wrapped around them, the
Gibson PAF uses instead 12 steel screws that transmit the magnetic field found in a magnet underneath the assembly, which can be seen at bottom center. Note on the bottom right
side, that Gibson still uses a small wood spacer (and IIRC it's supposed to be Holly wood, at that !) in the reissue pickup instead of more common plastic or fiberglass. Also note
the glowing sheen as this reissue PAF was manufactured with a wax dip to reduce microphonic feedback. In some pickups it may be possible at this point to gently slide the magnet
out, flip it over, and slide it back in. Try it, and if it doesn't move with gentle pressure ...
With the cover off you can clearly see the geometry of the bare pickup. Whereas most Fender type pickups feature six individual magnets with the coil wrapped around them, the
Gibson PAF uses instead 12 steel screws that transmit the magnetic field found in a magnet underneath the assembly, which can be seen at bottom center. Note on the bottom right
side, that Gibson still uses a small wood spacer (and IIRC it's supposed to be Holly wood, at that !) in the reissue pickup instead of more common plastic or fiberglass. Also note
the glowing sheen as this reissue PAF was manufactured with a wax dip to reduce microphonic feedback. In some pickups it may be possible at this point to gently slide the magnet
out, flip it over, and slide it back in. Try it, and if it doesn't move with gentle pressure ...
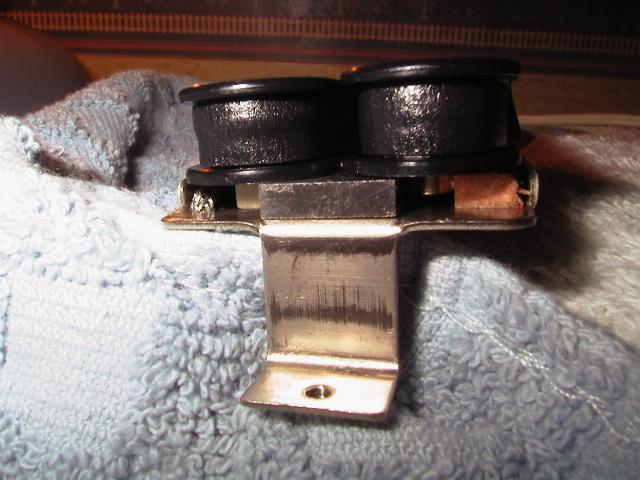
 The magnet assembly can be *carefully* unfolded from the base plate. If the magnet has been dipped in wax (a.k.a. "potted") it may be held together by the wax and it may be
necessary to gently heat the base plate with a soldering iron to loosen the wax and allow the assembly to move. Extreme caution must be used at this stage, as the pickup will be
damaged if the wires are broken. Here we see, at top, the magnet assembly, with the adjustable pole pieces on the left and the fixed pole pieces on the right. At bottom we have the
base plate and the wood spacer.
The magnet assembly can be *carefully* unfolded from the base plate. If the magnet has been dipped in wax (a.k.a. "potted") it may be held together by the wax and it may be
necessary to gently heat the base plate with a soldering iron to loosen the wax and allow the assembly to move. Extreme caution must be used at this stage, as the pickup will be
damaged if the wires are broken. Here we see, at top, the magnet assembly, with the adjustable pole pieces on the left and the fixed pole pieces on the right. At bottom we have the
base plate and the wood spacer.
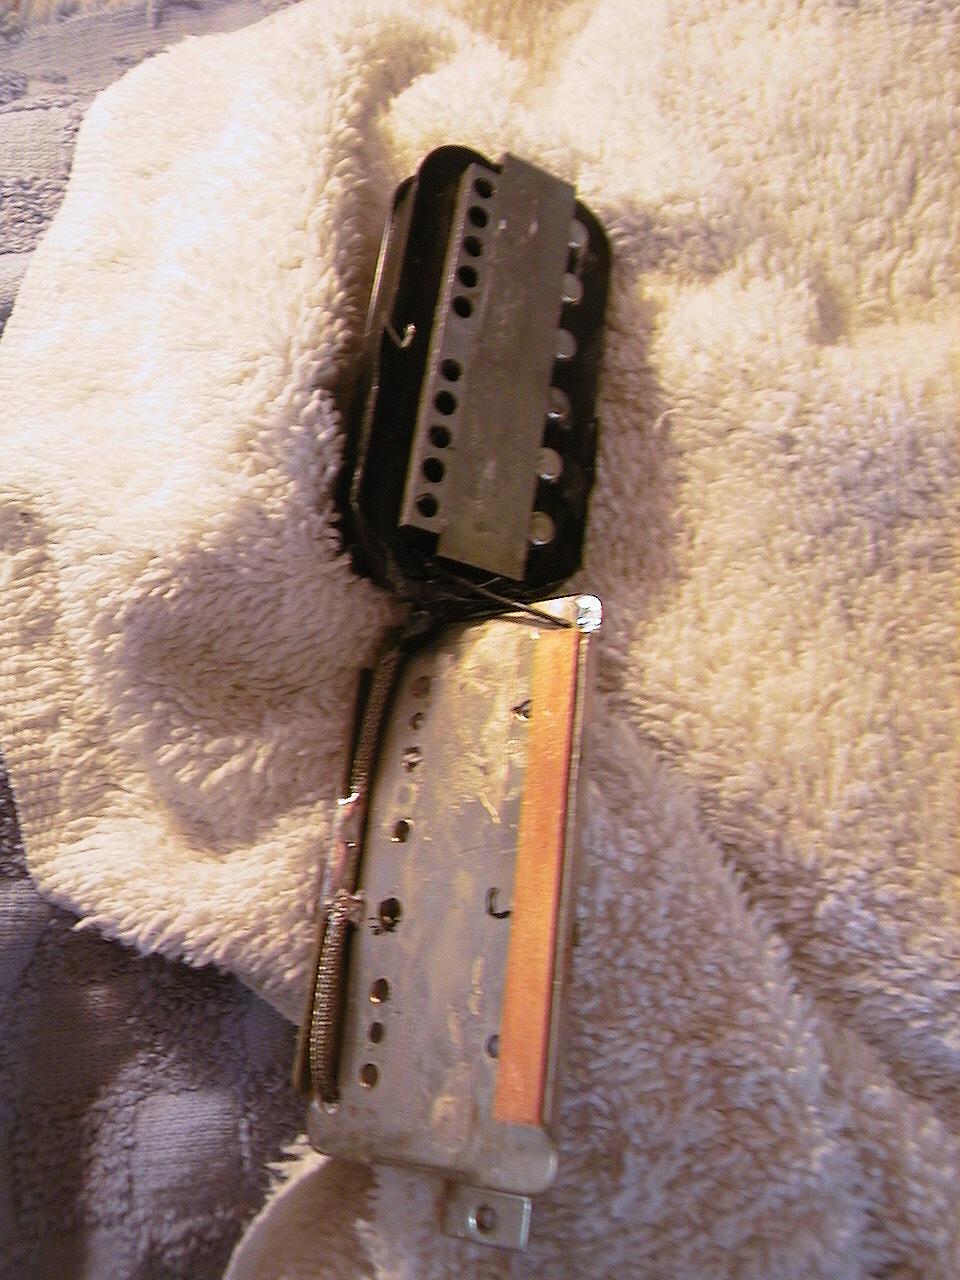
 Here we have a close-up of the magnet itself, the "engine" of the pickup. In this case it's visibly coated in wax potting, and this must be gently softened so the magnet can be
flipped over for the "Peter Green" mod. When the wax is heated it will turn clear. Note that on some pickups that aren't agressively potted, it may be possible to gently slide
the pickup out the side, without having to flip the assembly away from the base plate. In this case, the base plate was pretty well glued to the coils with all the wax! After the
wax is softened it's a simple procedure to gently remove the magnet and flip it lengthwise, swapping the magnetic (-) and (+) poles. It's interesting to note that different magnet
types can also be substituted at this point. Classic designs use magnets of differing recipe and strength, among them Alnico II, Alnico III, and Alnico V. Many modern humbucking
pickups also use stronger ceramic magnets, and given the appropriate dimension, any of these can be substituted.
Here we have a close-up of the magnet itself, the "engine" of the pickup. In this case it's visibly coated in wax potting, and this must be gently softened so the magnet can be
flipped over for the "Peter Green" mod. When the wax is heated it will turn clear. Note that on some pickups that aren't agressively potted, it may be possible to gently slide
the pickup out the side, without having to flip the assembly away from the base plate. In this case, the base plate was pretty well glued to the coils with all the wax! After the
wax is softened it's a simple procedure to gently remove the magnet and flip it lengthwise, swapping the magnetic (-) and (+) poles. It's interesting to note that different magnet
types can also be substituted at this point. Classic designs use magnets of differing recipe and strength, among them Alnico II, Alnico III, and Alnico V. Many modern humbucking
pickups also use stronger ceramic magnets, and given the appropriate dimension, any of these can be substituted.
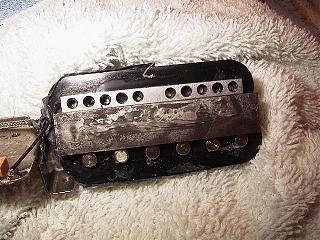
 Once the pickup has been reassembled in reverse order, the solder contacts with the edges of the cover must be rejoined. Fitting the cover back on the pickup is likely the most
dangerous part of the operation, as the jagged edges of the solder on the cover can easily slice through the coil wire which is smaller than a human hair, rendering the pickup
useless. Once the pickup is re-assembled, one can choose to re-pot the pickup in wax. In many cases removing the wax will open up the tone of a pickup, but at the cost of increased
sensitivity to feedback.
Once the pickup has been reassembled in reverse order, the solder contacts with the edges of the cover must be rejoined. Fitting the cover back on the pickup is likely the most
dangerous part of the operation, as the jagged edges of the solder on the cover can easily slice through the coil wire which is smaller than a human hair, rendering the pickup
useless. Once the pickup is re-assembled, one can choose to re-pot the pickup in wax. In many cases removing the wax will open up the tone of a pickup, but at the cost of increased
sensitivity to feedback.
Many sources incorrectly claim that the tone of the "Peter Green LP" was caused when the pickup's orientation was rotated 180 degrees accidentally upon reassembly, but here we see
the wiring channels of a period-correct reissue, and it's clear that it is impossible to accidentally install a pickup backwards as the harness and pickup design do not allow this.
Installing the pickup backwards does take a bit of fiddling in order to get the lead wires to clear!
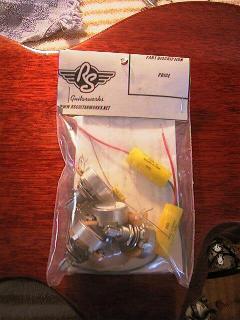
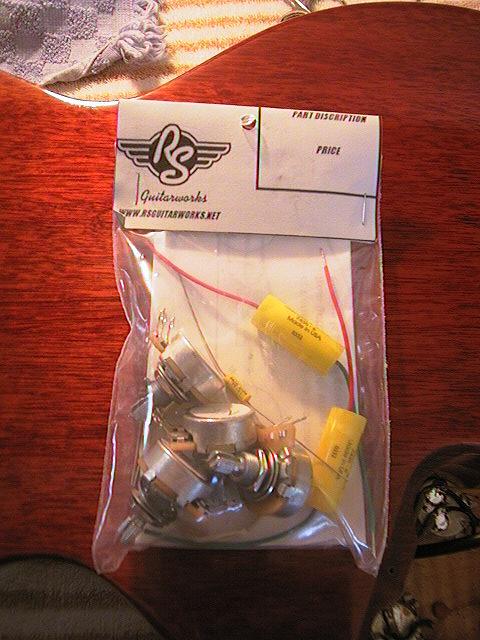 In the case of this guitar, since we're also swapping the pickup magnet, we will go ahead and perform another step necessary to capture the tone of that legendary Les Paul - the
removal of the current Gibson wiring harness and the installation of a period-correct harness. One can easily assemble the components needed from any variety of sources, in this
case we will install a ready-made kit from RS Guitarworks that comes complete with all parts and wiring diagram.
In the case of this guitar, since we're also swapping the pickup magnet, we will go ahead and perform another step necessary to capture the tone of that legendary Les Paul - the
removal of the current Gibson wiring harness and the installation of a period-correct harness. One can easily assemble the components needed from any variety of sources, in this
case we will install a ready-made kit from RS Guitarworks that comes complete with all parts and wiring diagram.
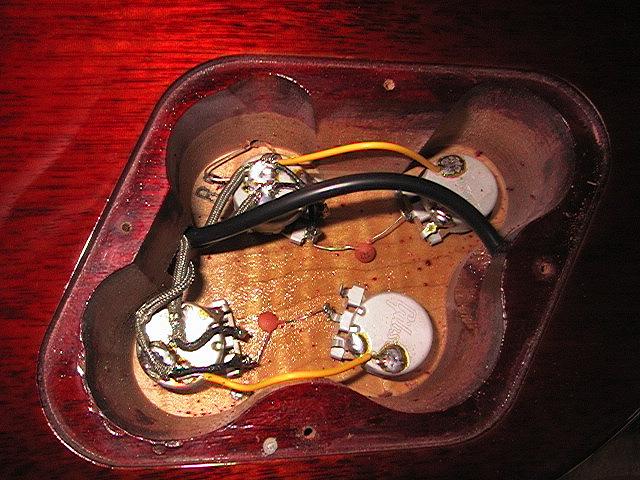 Gibson made a big deal about retooling the Historic line in 1999 for the "40th Anniversary" issue of the Les Paul which was supposed to be super accurate in every way. Great
strides were made, but the wiring cavity is a big disappointment when one sees the cheap components used on a guitar with a retail price that is more expensive than the street
price of some new cars!
Gibson made a big deal about retooling the Historic line in 1999 for the "40th Anniversary" issue of the Les Paul which was supposed to be super accurate in every way. Great
strides were made, but the wiring cavity is a big disappointment when one sees the cheap components used on a guitar with a retail price that is more expensive than the street
price of some new cars!
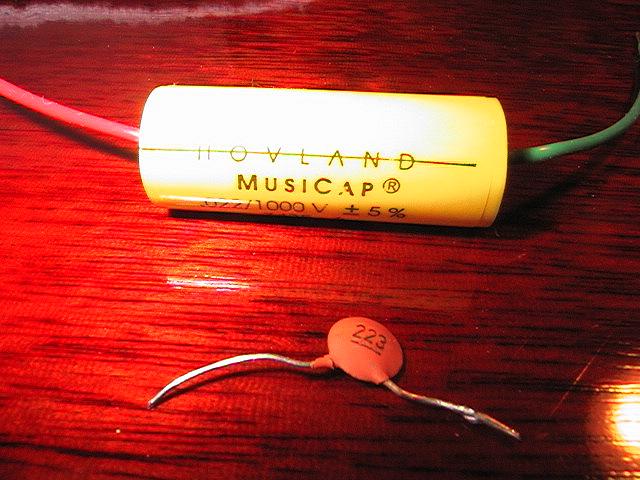 They say "size doesn't matter", but in this case the appropriate cliche would be "a picture is worth 1,000 words" as we compare the Hovland caps included in the RS Guitar Works
50s wiring kit with the cheap, stock caps the Gibson factory installed.
They say "size doesn't matter", but in this case the appropriate cliche would be "a picture is worth 1,000 words" as we compare the Hovland caps included in the RS Guitar Works
50s wiring kit with the cheap, stock caps the Gibson factory installed.
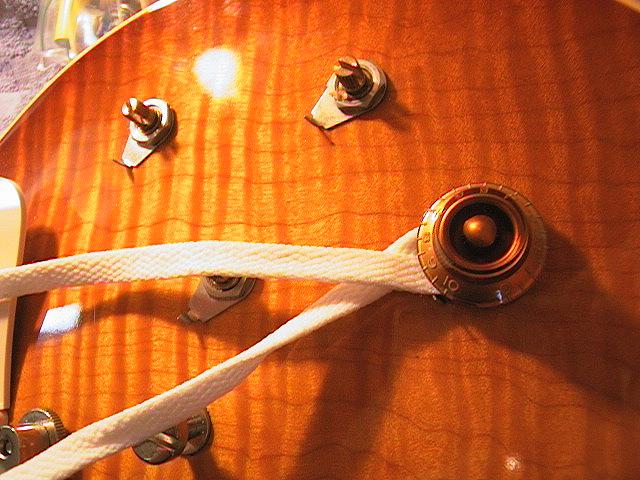 Swapping out the stock components and installing the new wiring harness is a snap for anyone with basic soldering iron skills. One place where Les Pauls can exact their deadly
revenge is in the infamous "finger slicer" pointers installed under the knobs. One neat trick for avoiding blood loss (and grabbing knobs that don't want to budge) is to use a
shoe string to get the knob started on its journey!
Swapping out the stock components and installing the new wiring harness is a snap for anyone with basic soldering iron skills. One place where Les Pauls can exact their deadly
revenge is in the infamous "finger slicer" pointers installed under the knobs. One neat trick for avoiding blood loss (and grabbing knobs that don't want to budge) is to use a
shoe string to get the knob started on its journey!
 Once you have everything all buttoned up, a new set of strings on the guitar, the Marshall warming up on "standby" and ready for sonic onslaught, there's one last step ...
obtain an original 1950s switch tip ring (left) and substitute it for the reissue ring (right). You'll have better tone in no time ... just ask Nigel Tufnel, who gets his
great tone from swapping the philips head screws for slot head versions!
Once you have everything all buttoned up, a new set of strings on the guitar, the Marshall warming up on "standby" and ready for sonic onslaught, there's one last step ...
obtain an original 1950s switch tip ring (left) and substitute it for the reissue ring (right). You'll have better tone in no time ... just ask Nigel Tufnel, who gets his
great tone from swapping the philips head screws for slot head versions!
Remember, turn that amp to 11 ... enjoy!